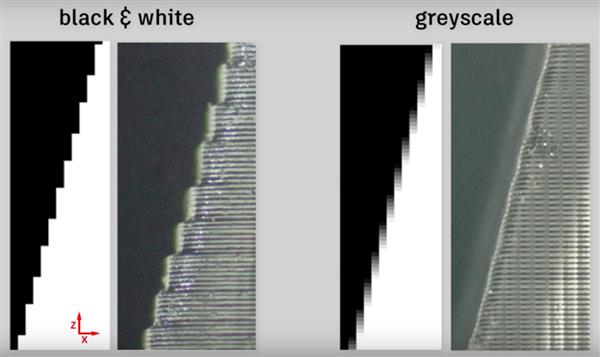
Smooth edges with gray scaling and anti aliasing
Introduction
In this article we will talk about gray scaling and anti aliasing to generate smooth edges on your slices. We will explain how this technique works on your GPU (graphics card) or CPU (processor)and how they both differ.
The goal of smoothing your edges is to reduce the number of lines and vertical artifacts you see on your 3D printed model. This works projecting gray pixels instead of purely white or black pixels. In practice this mean that each pixel space of resin will receive less energy from your light source when a pixel is gray. The pixel usually only grows from the inside of the object outwards as tests by autodesk have shown (see figure 1, src: autodesk). The result is that your edge is less pixelated and more smooth. We're basically printing a variable sized pixel on the border of your cross section.

Figure 1: Gray scaling effect on pixel growth (src. Autodesk)
Anti aliasing on your GPU
So how does the GPU calculate these gray pixels? It does this by a technique called anti aliasing. The goal of a GPU is to translate a 3D Model representation (usually your mesh's triangles) into a 2D image composed of pixels. Once a piece of geometric border (i.e. triangle) crosses a certain pixel, it means part of the pixel is outside of the object and part is inside of the object.
In a case of no anti aliasing you would say it is white when the majority of the pixel's area is inside the object and black when the majority is outside the pixel.
In the case of anti aliasing there are a number of color samples taken at different locations in the pixel. The average value of these black and white samples results in a gray value. In general this can be 256 shades of gray. 0 is black and 256 is white.
Sampling is possible with 2, 4 or 8 sampling points. See figure 2. Most software packages refer to this as "2x, 4x or 8x anti aliasing." The more sampling points used, the bigger memory buffer on the GPU is required to store these sampling values for each pixel. Most often, the difference between 4x and 8x is hardly noticeable for the human eye.

Figure 2: Different color sampling points for 1 pixel
Edge smoothing on your CPU
In some cases you might want to convert your vector based slices into pixel based slices. (I.e. you are going from .Slc to .Png format). This means a drawing operation and filling operation has to be performed. Most of the time this happens on the CPU.
During the drawing of the outlines of your cross section a similar sampling procedure as on the GPU can take place to determine the correct shade of gray for a pixel. Which sampling procedure is used is dependent on the graphics library used to draw the images. It is not necessarily worst then doing it on the GPU. It might not be performed as fast due to the parallel nature of a GPU.